Creating Concept Explorer Solutions (Pimcore Method)
Overview
Concept Explorer Solutions are made up of multiple components and are evolving rapidly. This document will begin as a basic outline of the components/ steps to creation and get additional details over time.
This document assumes you have proper access/ permissions to the NimbleStory backend (Pimcore).
- Overview
- 📘 Component Definitions
- 📘 Suggested Creation Sequence
- 📘 1. Setup for TileSet Creation (one time task)
- 📘 2. Create a TileSet from a high-res image
- 📘 3. Create a Core Visual, using the TileSet output (.zip)
- 📘 4. Create at least one Article or Portfolio Content
- 📘 5. Create a Perspective with Waypoints
- 📘 6. Finally - Create the Concept Explorer Solution
📘 Component Definitions
Solutions (Pimcore object “CESolution”) represents the “Card” for Concept Explorer in the Home/Project views of NimbleStory. A Solution requires at least one Core Visual, one Perspective, and one Waypoint.
Core Visuals (Pimcore object “CEVisual”) are the image tilesets we use as the background of our solutions. Important - at this time, we use an offline process to convert a high-resolution image into a tileset for Concept Explorer.
Perspectives (Pimcore object “CEJourney”) are the sets of waypoints/hotspots in “play” at one time.
Waypoints (these are stored inside of Perspectives in Pimcore) represent a single hot spot/ clickable area and the styling/ label/ content that gets shown on hover/ click. Waypoint content and styling is evolving quickly but can currently support:
Articles (simple content)
Links (embed or link out to external links)
Contexts (jump to a different perspective/ waypoint/ etc)
Portfolio Content (pdfs/ images/ videos/ etc.)
Digital Workspaces (Miro/ Mural/ NimbleSpaces/ etc.)
Articles (Pimcore object “CECard”) are content articles that can get displayed when a Waypoint is clicked.
📘 Suggested Creation Sequence
- Setup for TileSet creation (one time task)
- Create a TileSet from a high-res image
- Create a Core Visual, using the TileSet output (.zip)
- Create at least one Article or Portfolio Content so your waypoints have something to target
- Create a Perspective with Waypoints
- Finally - Create the Concept Explorer Solution
📘 1. Setup for TileSet Creation (one time task)
https://bitbucket.org/nimblestory/nimblestory-tilegen/src/master/
- Download and Install Docker Desktop - basic install is fine
- Download the files for TileGen from BitBucket
- setup a folder outside your normal documents like /Users/Bruce/CodeProjects/TileGen
- put the TileGen files in that folder
- open Mac terminal and get to that folder ex. "cd /Users/Bruce/CodeProjects/TileGen"
- list the files to make sure you are in the right place ex. "ls -al"
- set the script to be executable "chmod 774 tilegen.sh"
- run the setup process "./tilegen.sh setup" (this will create work folders/ etc.)
📘 2. Create a TileSet from a high-res image
- This process is best performed on a high-res image (4000px wide or larger)
- Use Finder to place an image in the "input" folder of TileGen
- open Mac terminal and get to that folder ex. "cd /Users/Bruce/CodeProjects/TileGen"
- list the files to make sure you are in the right place ex. "ls -al"
- run the list process "./tilegen.sh list" to see what files tilegen is ready to process
- confirm your image is in the list
- run the generation process "./tilegen.sh run" to convert the image into tiles
- you should see some output as it goes through the steps
- Use Finder to get the finished tile set file (.zip) in the TileGen/output folder
📘 3. Create a Core Visual, using the TileSet output (.zip)
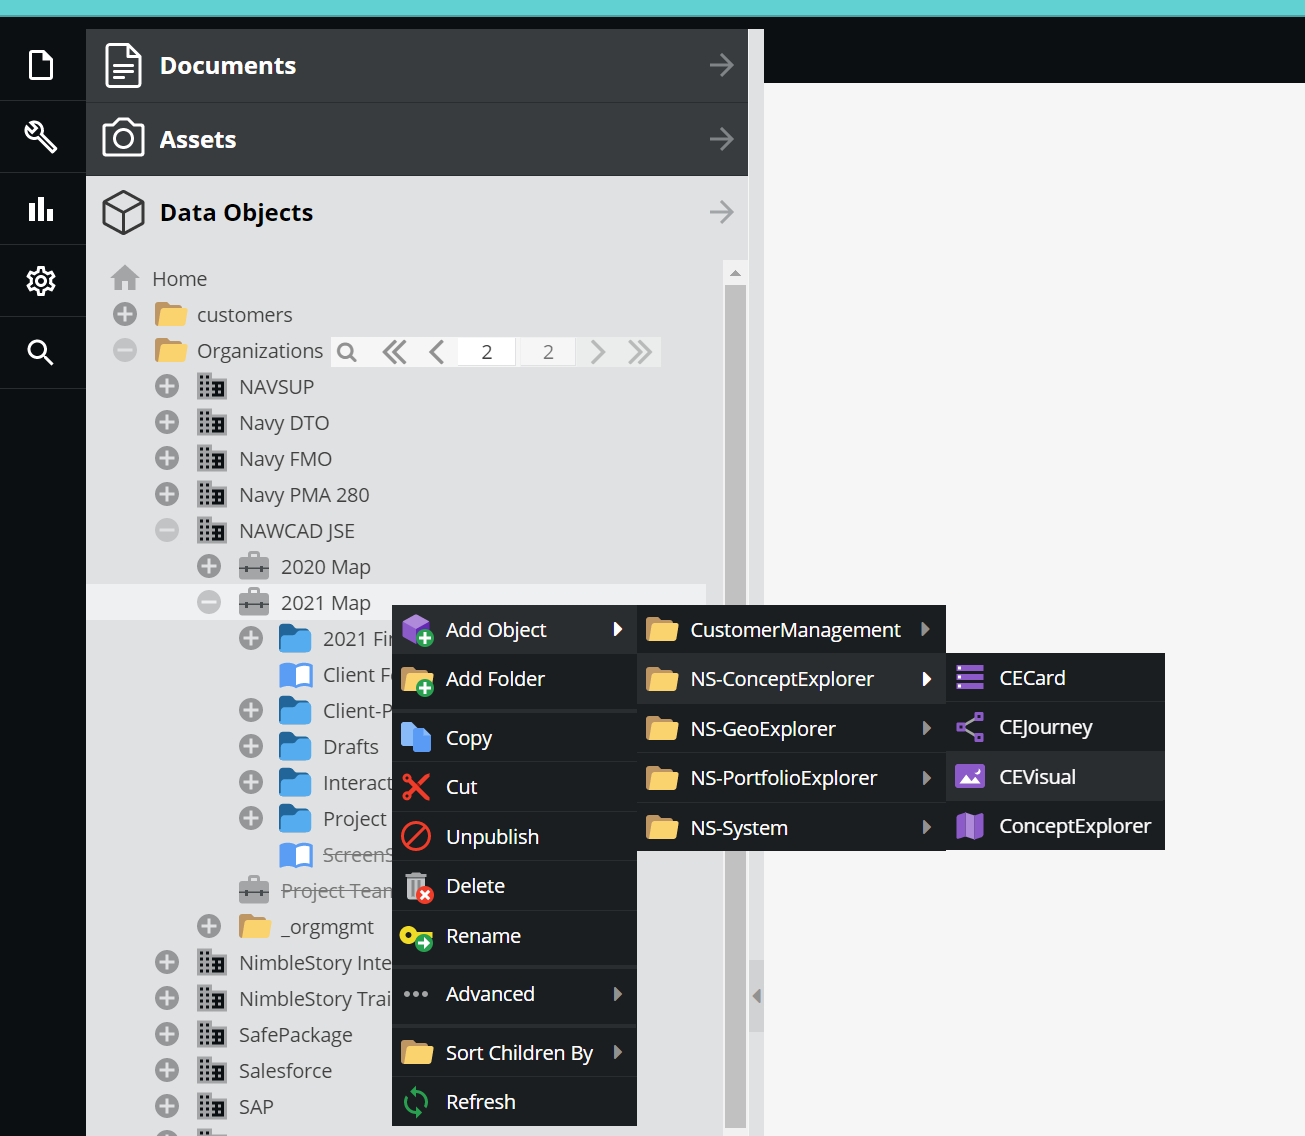
- In Pimcore, Navigate to the project you are going to add this to.
- It is suggested that Visuals, Perspectives, and Articles be added to a ContentFolder of that project but that is up to you
- Add a CEVisual Object from the right-click menu
General Tab
-
Provide a description of this visual (this gets displayed to the user in the About modal later)
-
Provide the original image in the “Thumbnail” view (don’t worry, this will get downscaled or output)
-
Visual File Tab
- Provide the Zip file from the previous step here
- Provide the Width / Height in pixels of the original image
- Provide the Options (defaults are 50/50/3/1/5)
- Provide a color for the background/border around the visual
-
Save and Publish
📘 4. Create at least one Article or Portfolio Content
- Documentation tbd
📘 5. Create a Perspective with Waypoints
- Documentation tbd
📘 6. Finally - Create the Concept Explorer Solution
- Documentation tbd